Visual Manna’s Master Drawing bY Rich and Sharon J e f i s This book is dedicated to all of our students that have becom...
810 downloads
2721 Views
21MB Size
Report
This content was uploaded by our users and we assume good faith they have the permission to share this book. If you own the copyright to this book and it is wrongfully on our website, we offer a simple DMCA procedure to remove your content from our site. Start by pressing the button below!
Report copyright / DMCA form
Visual Manna’s Master Drawing bY Rich and Sharon J e f i s This book is dedicated to all of our students that have become a part of our lives.
Copyright 1999 Visual Manna P.O. Box 553 Salem, Missouri 65560 573-729-2100 ISBN 0-9677386-2-8 This book contains text, diagrams, and photographs whose reproduction or use without permission violates the copyright law.
Jo Cameron (order #34083)
7
-"-
Table of Contents ......................................-.....-..........................."... .............. Page 3 Sketch Boak Glossary of Words to b o w ...................................................Page 4
Introduction .................................................... ................................................. Developing Your Own Style ............................................
Suppli es
Page 5 Page 6 - 7
...............................................................................................................
Page 7
Dimensions in Science and Art ............................................ Page 8 Lesson 1 .-.....-.. Shading ............ ......................................... Page 9 "
Lesson 2
.._.......... Creativity
..................................................................
Lesson 3
.......... Really Seeing
................................................................... Page 17
Lesson 4
...........
......................................_..........................Page! 21
Lesson 5
..-..-..... Perspective .....................................................
Lesson 6
...._.-,........... Faces ................................_.... "............-.... ......... Page 43
Lesson 7
.._........._.....Motion
Grids
Page 13
I
-- Page: 27
..............._..................-......-.-................ Page 55
.. ....... .... ........-. Page 61 Lesson 8 -..-..still Life Rhythm - Value ............"_............ ...-.._-..........................Page 62 " . . . . e . . . . . . . . . . . . I . . . . . . . " . . I . " " . . "
TSSOn
9 -.-. Animals
....-.......................... .......................... ....... Page 69 "
Contour Line Drawings ..................................... Page 72 .-...-.._..........._.........................-.......,-......Page 73 - 75 David Plank Cartoons - Caricatures .................. --......... Page 76
Lesson 10 _......._..Landscapes ..-.............
In Closing
....-.......................-....... Page 77
.........._.....................................-...............................".........,.-......."........... Page
84
2 Jo Cameron (order #34083)
7
SKETCH BOOK lines. These lines are only "construction" lines. They are a close representation of the form you want to draw, but they are not the form. After you have lightly drawn the entire shape; stop. Hold the page away from you. Stand i ~ and p move away if needed. Turn the page upside down. You may want to hold it up to a mirror, or if the paper is thin, hold it up to the light and look at it from the back. Look at it carefully. What is different from that which you are drawing? After you have closely inspected the lightly drawn picture, make any changes you feel are necessary. Do the close inspection again. If you are doing a major work, it may be good to leave it alone for sometime. Often, after a short time away from my work I can see things in a new, fresh way and can see places I really messed up. After you are quite satisfied the picture is exactly like you want, then start darkening the lines. Sometimes it is best if you do not erase on your paper. This is especially true if you are using expensive, high quality paper, such as 140 lb. watercolor paper or a n F m e yoia are planning to use watercolor or markers on the picture. Paper, comes with many different finis,hes. Some of these finishes are unable to stand the pressure of erasing. When you erase on certain paper it tears the surface fibers. Where these fibers are tom, the paper takes the color differently. This is particularly true if the color is watery or is a light color such as yellow. If the paper surface has been disturbed, the beautiful yellow sunlight may turn orange when it reaches the torn fibers. To avoid this, draw your preliminary sketches on a separate piece of paper. Transfer the sketch to the good paper. An easy way to do this is to turn your original sketch over, and using a soft pencil, cover the back of the page dark. This makes a graphite paper. Turn the sketch back over and place it on top of your good paper. Draw over the lines of your sketch that you want to keep, and it will press the graphite from the back of your sketch onto the good paper. This leaves a light pencil drawing that can be colored without any tom paper fibers to worry about.
This is a daily assignment best geared to the most serious artists. It is also one of the most dramatic ways to improve artistic skills in a short period of time. Have your student keep a sketch book. This should become a constant companion to the student and needs to be a tag-a-long wherever the student goes. As a continual project, have the student sketch five objects each day. These need to be real everyday objects; not something that is in the mind or from a photograph or painting. (The student can draw imaginary things, but they are not included in the assigned five objects). Finding five objects to draw is simple. Have the student look at the normal things around him. An example would be the tissue box on the table, the table itself, the pencil in the hand that is drawing, the wall, the chair, the car keys, the radio, etc. These sketches are just sketches. They are not finished works of art. They need to be done from the viewpoint and the perspective of the artist. The young artist should practice speed, but the main point is to have the sketches represent real objects. Try to draw clocks, shoes, even books. Take a single object and draw it from many different angles. Draw what you see, not what you think you see. Draw the object, rotate it a little and draw it again. Lower the object down or raise it up and draw it again. Stand over the object and draw it as you look straight down. If the object is big enough (like a chair), crawl under it and draw it from underneath. The combinations are endless. Another good exercise to learn to draw is to take a piece of black construction paper and Black Paper Cutout cut out several odd shapes. Next, place some tracing paper beside the cutouts and draw them. DO NOT TRACE. Draw the cutout as best you can. After you get it like you want it, place the tracing paper over the cutout. You can see how close you are. This is good training for hand eye coordination. Draw very lightly at first: so lightly that if someone sits across from you, they could not see the
U
3 Jo Cameron (order #34083)
7
Glossary of Words To Know Atmosphere Perspective - A way of showing distance in a picture by having muted colors in the background or distance, and darker and brighter colors in the foreground.
good example would be a parade scene where you see uniforms up close and in the distance the uniforms resting on top of another. Overlapping can make things look closer of furtlher away. It is also effective in creating a visual rhythm.
Balance - The arrangement of lines and shapes and tones in a picture which give it a visual balance. There are things equally interesting on both sides of the picture.
Perspective - One point perspective is sometimes called a linear perspective. It is defined as a mathematical system of representing a three dimensional reality in only two dimensions. A one point has all lines converging into one vanishing point. A two point perspeciive also represents mathematically three dimensional space on a two dimensional surface, but has two separate vanishing points.
Contour Line - A contour line is the line around an object or form. Contrast - The difference between the dark and light areas.
Rhythm - A regular repetition of line of forms that can denote motion.
Drawing - A sketch, design or representation usually made on paper with pen, pencil, pastels, charcoal or chalk.
Scale - The relative size of objects in a picture. How large or small objects appear next to each other.
Form - The external shape or appearance of a representation.
Shading - The use of different values in dark and light on an object to make it look realistic. Shading shows the shadow and the light in a picture. It gives roundness to otherwise flat parts of your drawing. When you draw, if you apply more pressure on your pencil, the shading will be darker.
Grid - A network of evenly spaced horizontal and vertical lines placed over a picture to assist in realistic drawing of the picture. Half-tone - The area of a subject that is lighted by a light source between the full light and the shadow or shadow edge.
Still Life - A representation of inanimate objects. Horizon Line - The place where the sky and earth seem to come together.
Texture - Texture is how something feels.
Implied Texture - This is when you draw something that looks like it has texture.
Value - In art, this is the shades (degrees) of darkness or lightness.
Light Source - This can be the sun, a lamp or a window. Knowing your light source can help you with your drawings.
Vanishing Point - The point at which something disappears into the horizon. The point where parallel lines appear to meet and disappear. When we stand and look down railroad tracks that are straight, they appear to meet at a single point.
Overlap - A simple technique that shows perspective. One object is placed in front of another. A
4
Jo Cameron (order #34083)
7
INTRODUCTION Judah: 3 And I have filled him with the spirit of God, in wisdom, and in understanding, and in knowledge, and in all manner of workmanship, 4 To devise cunning works, to work in gold, and in silver, and in brass, 5 And in cutting of stones, to set them, and in carving of timber, to work in all manner of workmanship.
Drawing is a learned skill. It is the same as sewing or playing the piano. There are some people naturally talented in sewing, piano and drawing, but nobody, to my knowledge, was ever born knowing all there is to know about sewing, piano or drawing. Sometimes these skills come easy. It often seems easy to the person that loves what they are doing. This, however, is not always the case. There are times when someone will really love piano, sewing or art, but will have a very difficult time getting it right. Sometimes, they practice and practice and feel they will never be able to do it. The works they attempt seem too complex and unattainable. The practice is often boring. Then one day, almost undetected by themselves, the things they do become simple, easy, and they start creating works beyond their wildest expectations. When you are in the middle of the practice, don’t get discouraged. If you want to become good at what you are doing you must practice. It is easy to be discouraged. When you practice and work hard, sometimes you see someone who never seems to try and does it well. You may tell yourself, “What is the use to go on; I will never be that good?’ Yes, they may have a gift. Yes, it is hard for you. But your desire to be a great artist is in you, not by chance. Maybe not even by choice. It is there given by God. A deep held conviction is conformation that what you want to be is from God. It may be that what God wants to communicate through art can only be done through you. He may want to use you, your personality and your life experiences to demonstrate who He is to others.
Isn’t that interesting? When you think of someone being called by name, you think of being called to be a preacher, called to be a missionary or called to be a doctor. There, in Exodus, the man Bezaleel was called to be ;an artist! To do beautiful art work for the tabernacle of God! The purpose of this book is to help students with their drawing skill. I always try to teach the drawing basics, and within this framework allow each student as much freedom as possible to develop their own style. I found students enjoyed their work and did a better job if I allowed them to choose a subject they had a feeling for. Some students love western art; some prefer landscape and nature study; athletic art (pictures of athletes in action) is also popular. Once the drawing basics are taught, much freedom needs to be given in the choice of a topic. Each studenit of drawing has a distinct and individual style that needs to be developed. This is one reason to expose students to many different artists and styles. I even had one college painting teacher wlho instructed us to do ten copies of the masters in painting, before we first attempted our own. Many professional artists do preliminary sketching and photographing of what they want to draw or paint before they begin.
In the Bible, in Exodus Chapter 31 God says something curious.
For a free drawing board, go to your local hardware store and ask them for tht:ir discontinued masonite samples.
Exodus 31: 1¶ And the LORD spake unto Moses, saying, 2 See, I have called by name Bezaleel the son of Uri, the son of Hur, of the tribe of 5
Jo Cameron (order #34083)
7
Developing Your Own Style I believe it is important to see how a real profesEveryone, regardless of economic or ethnic background, has an obligation to do what they can to improve society. As artists, we have a unique opportunity in this respect. We have the possibility of creating art which can bring light to the eyes of those viewing it. Indeed, life without art is less civilized.
sional artist draws. David Plank, one of the most outstanding bird artists in America, has graciously allowed us to look at some of his preliminary sketches and studies of various birds. You can see some of David’s field drawings on pages 73-75 of this book. He has definitely developed a distinctive style in his drawings and paintings of birds. David Plank has had eleven cover paintings for the magazine The Bird Watcher’sDigest. He has been accepted in numerous national and international art shows and won several awards. He has approximately 1200 water color paintings and 50,000 field drawings of birds to his credit.
Although the mechanical side of creating art---the act of drawing and painting---requires a great deal of work and practice in order to be skilled, the creation of art is more about a way of seeing and thinking. The word %reat&’tells us that art is not about copying what we see, but expressing our thoughts and feelings; thereby “‘creating”something new and original.
More than this, he is a tremendous encouragement to children and young people in their appreciation of birds. He takes part in various community and school activities and takes every opportunity to encourage young people to study and be involved in art and especially birds. Perhaps you have an artist in your community who will allow your students or children to visit their studio. It will be an enriching time for your young artists. David Plank communicates to us his love for and appreciation of birds. Can you think of something you want to communicate visually? Are you willing to practice...p ractice...p ractice ...to succeed?
The physical subject matter of a painting can be quite secondary to the real message of the painting. In my case, birds have always been meaningful for me and the inspiration fior creating art through which I can express myself and communicate some of those thoughts and feelings to others. For more than fifty years I have sketched birds in fields and forests; using these drawings, and the experience of being outdoors, to create watercolor paintings. While art is the puqpose of these paintings, I hope they also will influence people to care more about birds and the natural world which is required for their survival, as well as our own. Some may be inspired to become bird watchers; one of the most civilized activities of mankind.
A PHILOSOPHY OF ART by David Plank Whether we plan to pursue a career as an artist or not, an introduction to art and the process of drawing and painting will enrich our lives and give us a greater awareness of the world around us.
To contact David Plank conceirning his wonderful prints of birds write:
David Plank P.O. Box 751 Salem, Missouri, 65560.
If we do become artists, what we create should not only be meaningful for us, but affect others in a positive way. 6
Jo Cameron (order #34083)
7
Let’s talk about supplies.
The Visual Manna philosophy of art is this. Art is more than just being able to draw. Art is more than being able to paint or do sculptures. Art is being creative. God is creative. Have you ever seen a duck billed platypus? God has created us in His image. Part of that image is His creative nature.
Lets talk about paper and pencilis. Paper comes in pound weight and texture. To understand the weight of paper you must first understand that a real sheet of paper is 17 inches wide and 22 inches long. What we see in “regulaa” typing is a sheet cut into four pieces. This makes them 8 112 inches by 11 inches. Regular typing paper is called 20 pound paper. This means if you had 1000 whole sheets of paper they would weigh 20 pounds. Typing paper also has ia smooth finish. The finish on paper is called the: tooth. Twenty pound smooth tooth paper is golod for typing or copy machines, but not for drawing. Good drawing paper should be at least 60 pound and should have a fine tooth. The fine tooth is hard to describe, but once you feel it ne:xt to typing paper, you will know. It feels rough, but not coarse.
Sometimes children can get frustrated when doing art. This is often, in part, a problem that their brains (creative nature) are lagging behind their technology or physical development. Technology problems occur when the child has ideas best rendered in pen and ink and they only know crayons. Or the idea is in tempera paint, and could best be demonstrated with computer cinematography. Physical development or fine motor skill development or manual dexterity develops at different rates depending on the child. Because this will improve as the child ages and practices, it is of little importance in teaching art. Probably the most important thing is to let the children create and to encourage them.
Pencils do not have any lead in them anymore. The Egyptians ruled lines with metallic lead, as did medieval monks. The earliest pencils were charcoal or lumps of colored earth or chalk. The so-callled lead pencil-a rod of graphite encased in wood-came into use in the 16th century. From the late 18th century pulverized graphite was mixed with clay to bind it and to provide different degrees of hardness--the more clay, the harder the pencil. Today, the mixture is forced through clies, cut to the required length, and kiln-fred. The rods are laid in grooves of a thin board; a similar board is placed over them, and the wood is shaped into pencils, usually of round or hexagonal cross section.
How do you hold the pencil? Some say to hold the pencil between the tips of all of the fingers of the hand. Some say to hold it like you do when you write. Some hold the pencil by the sides and place the index finger on the pencil lead point. I say that you should hold your pencil in any way you are comfortable. You are in charge of the pencil, not the other way around. I will often use all of the above techniques along with others on any picture depending on the results I want to accomplish. Holding the pencil closer to the point makes it easier to Inake a dark line, and if you hold the point sideways, you can make a thicker line.
7
Jo Cameron (order #34083)
7
side as to view its length. Next view it from an end where you can only see its height. There is only one object in your hand. It is your relationship to the object that gives you three distinct sides to observe. Maybe God is something like the things He has created. Like time, space and matter, God may be a trinity that reveals different sides of Himself to each of us depending on your relationship to Him or His relationship to you.
All of this about pencils is important because when you start sketching, it is important to draw lightly. If you cannot make a sketch that is so light that it cannot be seen from five feet away, you may need to get a harder pencil. Use a 5H or 6H, but experiment to find what works best for you. Now some of you are ready for and are comfortable with using B or soft pencils. Maybe you like the dramatic look. This is okay if you are contident of your line and never have to erase. For the rest of us, a light touch or hard pencil is best.
God said in Romans 1:20, “For the invisible things of him from the creation of the world are clearly seen, being under--Lstood by the things that are made, even his eternal power and Godhead; so that they are without excuse:” This means that you can know something about God by looking at what He has created.
Now a word about three dimensions. IN SCIENCE In science, the universe can be said to exist as a trinity. That being the trinity of time, space and matter. Each of these is in itself a trinity. Time comes in past, present and future. Matter comes in solids, liquids and gases. Space is anything that occupies three dimensions --and it could be said that space comes in: height, width and length.
Making Something Three Dimensional
IN ART
The present time you are in is no different than the past time you just left and no different than the future time you are going into. It is your relationship to it that makes it seem different. But there is only one time.
In art, there are also three dimensions. To end some confusion, art is divided into three separate categories. One dimensional ;artis anything flat. Paintings, pencil drawings, charcoal, watercolor etc. are all one dimensional art. Two dimensional art is anything carved into a surface or raised off of a surface. Three dimensional art is . sculpture or statues, or anything you walk all the way around and it still looks like slomething. Clothes, cereal boxes, drink cans and cars are all examples of three dimensional art. Artist touch many more things than you might have imagined.
Liquid water is really the same matter as solid water (ice), which is the same material as gaseous water, (steam.) It is your relationship to it that makes it seem different. But there is only one matter. An object that occupies a space has a height, width and a length, but is only one object. Hold an object in your hand. Look at it from only one side and see its width. Next, look at it from one 8
Jo Cameron (order #34083)
7
LESSON 1 the shade. #3 is just straight lines, the more lines the darker. #4 is contour lines. These lines follow the shape. The lines are made longest first, and then shorter and shorter lines are added between each line. #5 is shading made by a pile of pencil lead (graphite) placed on the paper and spread out with a smudge stick or forefinger.
Shading a cylinder or a sphere. The quickest way to make something look three dimensional is to apply, shading, shadow and texture. The purpose of shading is to make the object dark on one side and light on the other, with the easiest gradient as possible.
LIGHT
-%g
LIGHT
Draw a cylinder. Pick the direction the light is coming from.
.2 Shade the cylinder. Try several techniques to determine which one you like best. Some techniques may work better for you on one kind of picture than another, so get familiar with all of them.
A large part of being an artist is being observant. Take your drawings and really look at them. Turn them upside down and look carefully. Turn them over on the back and look through the paper, by holding it up to a light. What do you see? Are all the vertical lines really vertical. Get a straight edge and lay it a long a supposed straight line, is it straight? Next time as you begin drawing, remember what you observed and make corrections before you darken your lines.
In fig.2, I used several techniques on the same cylinder. #1is pointillism; the use of dots or points; the more dots, the darker the shading. #2 is cross hatching, the more cross hatch the darker
9
Jo Cameron (order #34083)
7
This is an example of a sphere shaded with a single light source.
This sphere, fig.1, was shaded with a combination of techniques. Draw several basic shapes and shade them in using various techniques. Try doing cones, cylinders, rods and spheres.
Notice this example of incorrect shading below. The cube’s sides look rounded. This is because the use of Cones a gradient makes the flat sides curve. I would not say, “Never shade like this.” Someday you may want SO far we have been doing objects With C w ~ d a metallic look. Which is what the cube below looks surfaces. like. But in general, to make a cube look “right”, keep each side flat by the use of uniform shading as explained earlier.
Cubes
Incorrect Shading As part of this lesson find some real objects that represent basic shapes. Cylinder shapes for example are hair spray cans, flashlight batteries, soup cans, paper towel rolls, bananas, carrots or telescopes. Sphere shapes are, marbles, balls, green peas, frog eggs, oranges or apples. Get several examples and draw them from different angles. Be careful to draw what you see, not what you think you see. A good artist is a good observer.
Correct Shading When you shade things with flat sides such as cubes, you shade each side the same tone, like the ones above. This is because the side is not curved. Each side should have a slightly different shade, depending on the light source.
10
Jo Cameron (order #34083)
7
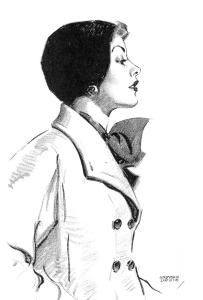
These three apples are drawn from three different angles.
Shade each object as you see it. If it does not have a definite light source, move it to a light source. For the time being, don’t try to imagine the shading, set it up so that it has shading.
Remember to draw what you see, not what you think you see.
Nearly Empty Paper Towel Roll
11
Jo Cameron (order #34083)
7
These plates came from my sketch book. They are a study in foreshortening. Foreshortening is the apparent change of shape as an object as it is tilted or receding from or projected away from the viewer. An example of this is when someone is pointing directly at you OT away from you. If someone is pointing their finger at you,all you can see is the tip of the finger, some knuckles and some roimdness of the forearm. Another example is a ceiling fan. If you are right under it when it is spinning fast, what you see are the blade tips as they inscribe a circle in space. If you were standing on a ladder at eye level with the moving fan blades, you would see a line. The shape the spinning blades inscribe in space has to change from a line to a perfect circle. It goes through a series of squashed circles called ellipses. That is foreshortening. That is also what these plates are doing. If you are looking straight at the plate’s edge, it is almost a line. The farther you move the plate up or down, the more like a circle it becomes. I want to mention your sketch books again. Almost every drawing in this book was at one time part of my sketch book. All of my paintings, charcoal, pencil and ink drawings all have their roots in some sketch book. Drawing everyday objects may seem boring sometimes, but the practice you gain from doing them can not be over emphasized. If you do get bored, start putting the pictures together in imaginative ways. Draw your car,but have it on the living room chair. Draw a spoon with a tree in it. The combinations are endless. The most important things are to draw real things. Draw them like you see them and not how you think you see them. And as you draw remember: shape (outline), shadow, shading and texture.
12
Jo Cameron (order #34083)
7
LESSON 2 Creativity If I would have drawn a skyscraper in this picture as big as the critter’s toe, it would make it seem much larger.
In this lesson we want to be creative. Draw something never before seen by mankind. It can be animal, vegetable or mineral. I find it best to draw animals, but that is only my preference.
The picture has several other features you can put in a drawing to make it better. Center of interest should be the place your eye first goes in a picture. Some artists, when using color, will put a little red on the center of interest to catch the eye.
First, do an outline picture. You may want to layout the picture using circles or basic shapes to “hold the space” until you get the whole picture. Second, determine which direction the light is coming from. Third, start shading your picture, as if each individual part was a cylinder, cone, sphere or cube. Next, give your creation shadows. Shadows generally fall directly in line with the direction the light is going, and roughly approximate the shape of the object that is casting the shadow. Give your picture texture. If you did an animal, you can do fx, feathers, or scales. ‘&
\+ -3 .rr
h
This picture also has depth. It is illustrated by the trees in the distance being smaller than the trees in the foreground. The last two things this picture has are the name of the artist and date. Artist have two ways that they use to sign their work. One way is to sign it along the edge or around the border. If you do this, make sure it is far enough from the edge that a frame would not cover it up. The other way to sign a picture is to make it part of the picture. In the picture above, it is signed along the edge of the finger and on the critter’s bracelet as examples.
!I;
‘4 ?u
b ‘k
Scale your picture by putting something of known size in your picture. In (fig. 1) the picture is scaled with the finger the critter is standing on.
Cylinder casting a shadow.
13
Jo Cameron (order #34083)
7
14
Jo Cameron (order #34083)
7
15
Jo Cameron (order #34083)
7
1
I
Here are a several more examples of everyday sketches from my sketch book. One is a dented “Roasted Garlic and Onion” Spaghetti can, another is a book on a coffee table, and the last is an old toothbrush. Each started out as a basic shape. The can is a cylinder. The toothbrush and book are rectangles. The can might tell an interesting story if it was by my backpack or camp fire.
. ...
.......
‘i
.. .
16
Jo Cameron (order #34083)
7
LESSON 3 When you draw your hand, if you straighten out your fingers, it will be easier; if you bend your fingers it will be a little harder. Stretch yourself if you can; that is the only way you can grow. If you are younger, if you want to trace your hand, it will be okay. If you do trace your hand, the main point of the lesson is to shade your fingers as if they are cylinders.
Really Seeing The previous lessons used a lot of imagination. For the most part creativity is good, and to have a great imagination is essential to being a good artist, but it is also important to be able to draw from reality. When Raphael wanted to draw a dragon, (dinosaur), he first learned all he could about his subject from eyewitness accounts, then he looked at reptiles he had available such as snakes and lizards and combined them with bat wings and other animal parts to produce a life like animal for his picture “St George and the Dragon.” When Steven Spielberg wanted to create lifelike dinosaurs for his movie “Jurassic Park,” he first studied large animals such as rhinos, elephants and giraffes to see how they moved and how the skin flexed. He then copied what he found. To start drawing from reality sometimes is difficult. This is particularly true if you have only drawn from your imagination or copied other pictures.
Remember to pick a light source so as to give the hand shadows and shade.
Something that is handy, (so to speak), to draw from real life is your own hand. This is not easy. But the way to get better is to practice, practice, practice. Again, draw what you see! Many young people tend to draw their fingernailslike this.
If you observe
Observe carefully what you are drawing. Just because something has five lobes on it, it doesn’t make it a hand. The difference is in the details!
17
Jo Cameron (order #34083)
7
sents the center line of that finger. Do the same with all of the fingers. It should look like Fig.3.
Many times children have a difficult time drawing things as complicated as a hand because they try to draw the picture as a whole, using a continuous contour line. They generally start drawing from the thumb and continue to the lit(; > ) ,.,+i I1 / $ method can work I if you have good d coordination I’ between the pencil and your eyes. For the person wanting to learn to draw, it is a better idea to break the object up into smaller pieces and do one section at a time. Another way to look at it is that you can establish mid point corrections, so you will end up where you want to go. Much like astronauts do when trying to get to the moon and back. If you don’t hit the midpoint you will m i s s the last point. Fig.1
r”;
r, 1; \ ‘
1
6
?
.&
Now that you have all of these points and construc. tionlines, you can add points that represent Fig.3 the valleys between each finger. After you have all of the ’“mid-points,’’ now start drawing the hand like you would normally. I
P
g
,p Q
Fig. 1
I’
$’
?’:
Look at you hand and pretend that it has lines that run down the middle of your fingers. Draw these lines on a piece of paper. They should look something Like the one above. Next, lay a pencil across your finger tips. Fig.2 Look at the angle the pencil makes and place a mark at the same place along the line that repre18
Jo Cameron (order #34083)
7
This is an example of drawing from real objects. I used common things in an imaginative way. The hand is mine. It was easy to use. The picture was easy to find. This picture of the world is one of the most widely produced photographs in the history of civilization. It was taken from Apollo 17 and is called the “Blue Marble.” If you look around and are observant, you can see it everywhere. The hand has a nail wound in its wrist. It is supposed to be Jesus’s hand. The Bible clearly states that Jesus was nailed in His hand. Why would I put the wound in His wrist? There have been studies made over hundreds of years by many scholars trying to determine if someone could be held on a cross with a nail in the hand. They also wanted to know if a body could be held without tearing out through the hand and, would it possible to nail through the hand without breaking any bones? (The Bible said that none of His bones would be broken). The answer to these questions was found in linguistics, not in anatomy. It turns out that the Greek word for “hand,” starts at the elbow and goes all the way to the fingertips. The writer of the Greek New Testament didn’t have our word for wrist, so he said that Jesus was nailed through His hands.
19
Jo Cameron (order #34083)
7
LESSON 4 In the same manner that you broke up the drawing of your hand into smaller pieces using construction lines made up of center lines and end points, there is a more formal way of dividing a picture called a grid.
Grids
How to Use a Grid The grid is the easiest way to copy one dimensional art. It is so easy that some people believe that it is almost like cheating. It i ...*I i.......,...-.. I3 _...-....“L isn’t cheating; many great artists have used grids to transfer their sketches to their canvases. The grid only works on one dimensional art. You will have a hard time drawing grid lines on a statue. There are two ways to use a grid. One way is to do the entire outline first, and then go back and complete the inside. The other way is to do one single square at a time, completing each one before going on to the next. Whichever way you use, try to remember to draw what you see, and not what you think you see. Doing a grid can help you become a better artist by letting you see the relationship between each separate part of a whole drawing. Remember that using a grid is only one way of several in which an artist uses to copy a picture. Some of the other ways will be described later in this book. When you do a grid, the important thing is to observe the relationships between lines or parts of objects in the picture. In the map picture above, you should notice that the tip of Florida is just over the line that runs through the center of the east coast. This is the same thing you were doing with your hand in the previous lesson. When you laid a pencil across the tips of your fingers, you were establishing a relationship between the fingers and illustrated by the angle the pencil made.
u-.
Doing grids has some disadvantages. The biggest is that it only works with one dimensional art. This means you are copying flat pictures. The grid does has some clear advantages. The biggest of these is that it is a fast, accurate, and easy way to copy a picture. It helps me most when, after doing many sketches of “real” three dimensional objects in my sketch book, and finally getting the right combination so that it looks just right, I can grid the sketch and get it to my canvas rather quickly, and it will look just like the sketch. Another advantage is that you can, by changing the sizes of the grid lines spacing, make your final work bigger or smaller. If I grid the sketch book with one inch grids, and the canvas with four inch grids, it will be four times as big when completed.
21
Jo Cameron (order #34083)
7
Here is an example of doing the grid as a complete line drawing first, and then filling in the details. It is a good idea to count the blocks, to get the placement on the page that you want. I sometimes will number the grid blocks on the picture and then number them the same on the grid paper. This will help keep it straight and keep you from loosing your place.
The complete outline is finished and ready to be shaded.
4 ;
i
The shading complete and ready to smudge.
22
Jo Cameron (order #34083)
7
On this page I used the same picture and the same grid.
Find several pictures that you would like to draw. Grid them with one inch squares. Grid your drawing book with the same grid. Try to do the grids in the ways described above. Now do the same picture again, only this time grid your drawing book with two inch grids. Do the picture one more time, only this time grid your drawing with half inch grids. Try to do other pictures. Vary the size of the grid on the picture you are copying. You should notice that close grid lines provide greater detail, but wider lines get done faster.
Jo Cameron (order #34083)
This is the completed sketch, it has been smudged for a better shade gradient and the hair stroked on for texture. Now it will need the grid lines erased.
7
Now for a practical use of the grid. I choose to explain how to use an invisible grid on this skeleton for two reasons. One, youneed to understand the human skeleton to better understand
Hold your pencil in such a way as to be able to look with one eye over the pencil point. Try to make it appear that your
thumb up until it appears to be under the person’s chin. This length will be a unit of mea-
1
On the next page you can see how the length of the head was used to determine how tall this person is.
Use these two measurements to form a g i d over whatever you want to draw.
24
Jo Cameron (order #34083)
7
Measure the head, using a pencil and your thumb.
1
2
3 4 5 6
7 1 2 You can tell by this illustration that an adult person is seven and one half times the length of hidher head. If you study the actual grided skeleton, you can make some observations that are valid for most adult people. For instance, the hand is a full three head spans below the actual head. The hips are two heads below the chin and the knees are four full heads down. Look carefully, and you can learn other relationships of one part of a body to another.
25
Jo Cameron (order #34083)
7
As you can see, I used the head of the squirrel as the unit of measure. This squirrel is roughly three times its head long and two times its head tall. Once I had the head drawn, it was easy to measure the entire squirrel. I used the head to make an invisible grid to draw the rest of the squirrel. If I would have drawn the head four inches long, the finished picture would be approximately twelve inches long and eight inches tall. If I had drawn the head only two inches long the finished picture would be six inches long and four inches tall. After I had the size of the squirrel marked out, I then started doing a contour line drawing. After I had the outline, I shaded the squirrel as if were three dimensional. And lastly, I stroked the hair on to give it texture.
26
Jo Cameron (order #34083)
7
LESSON 5 the horizon line you can see in the bottom and the Lets do perspective. one below you can see in the top. Instead of the regular infinite point in the distant, I have replaced them with these eyes.
This perspective stuff can be one of the hardest things to learn! It can also be one of the most rewarding. Younger children need to be exposed to this, but they probably won’t get it. There is a part of the brain that develops the ability to do logic, algebra and other spatial concepts such as perspective when the child is between 10 to 18 years old. Some children develop this ability earlier and some never do. I tell my students that it took the human race over 5000 years to figure this out and if they don’t get it right away, don’t worry about it. If the student doesn’t understand perspective this time, he or she will have an easier time understanding the next time they try.
This is an easy way to remember that the vanishing points and horizon line are your
Look at the desk in front of you. It is below your eyes so you see on top of it. Now try to see on top of the book case or kitchen cabinets or any other thing that is above your eye level. This same effect takes place in every pic-
Mankind has placed things in the foreground larger and things in the background smaller for centuries. But it wasn’t until the middle of the Renaissance that Brunellechi figured out how to do perspective systematically.
HORIZON LINE 1
To make this as simple as possible, I will introduce two point perspective first and one point last. They get their names from the number of vanishing points the picture has. However, in reality all pictures are two point perspectives. In a one point, the second point is so far to either the right or left that when lines are drawn to them, the lines appear to be parallel.
HORIZON LINE 2
I will explain the terminology first. The vanishing point is an infhite point in the distance where all horizontal lines appear to originate. These two points represent the eye level of the viewer of the picture and a line drawn between these points makes the horizon line.
Notice that every picture should have only one set of vanishing points and horizon line. Notice how these boxes (fig.2) look when they are placed side by side, giving the picture two sets of vanishing points.
Notice on the two boxes (fig.l), the one above
Thus, it makes the picture look bent, or just out of
27
Jo Cameron (order #34083)
7
Let’s make a simple box on the horizon line. Because it is right on the line, you cannot see the top of the box or the bottom. Remember to draw these lines very lightly. They are only construction lines and will need to be erased when the box is completed.
I Vanishing Pclint
Vanishing Point
\
\
I
It is almost always easiest to draw the near edge fist, or the closest corner first.
28
Jo Cameron (order #34083)
7
.
29
Jo Cameron (order #34083)
7
Sometimes to get a more dramatic look, I will intentionally pull the vanishing points closer together. You have to be careful because if you get the vanishing points too close together, it will make the picture look odd. It will be technically correct, but will not look right. Below is a box drawn correctly, but as you can see when the vanishing points are put too close together, it begins to look strange. Sometimes I use this radical look to enhance the picture and make it more dramatic. Look at the picture on the next page; it is an example of close vanishing points used to make a more interesting picture.
One thing you might notice is that the farther the two vanishing points are apart, the more natural the picture looks. Sometimes when doing drawings from photographs, I will find the natural perspective points by placing a straight edge along the roof and foundation lines to see where they come together. This will often be several feet off of the photograph. When I start the drawing, I will tape my paper down in the middle of a table. I then mark the vanishing points on the table. Sometimes, I will tape a string to these places on the table and use the string as a straight edge to draw the right lines.